How To Make Different Heading And Page For Each Page In Word Mac
суббота 05 января admin 89
If you have got a table that extends over several pages in a Word document, it’s useful to be able to repeat the header row at the top of each page automatically, so that it stays there no matter what you change in the table itself. This article shows you how to do that in Word 2007 and Word 2010 (we use the same procedure for both) Why would I want to repeat my header row on multiple pages? If you’re presenting a table which contains fairly self-explanatory information, for example, name, surname, book title, year, then you probably don’t need to repeat the heading row, even if the table runs across more than one page. But if you think that the person who will consult the table will need to keep reminding themselves about what the different columns contain, it’s useful to add the header row at the top of each page. Doing this automatically rather than manually inserting a new row into each page of the table ensures that however much the table changes, the header row will stay at the top of each page. How do I repeat the header row in Word? Unzip for mac.
We’re going to use the example of a list of books I have read. Here’s the table: Now, this is a long list, and it goes over more than one page. OK, it’s fairly self-explanatory, but I might forget what the Acquired and Read headers are. At the moment, when the table goes onto the next page of the document, the table just carries on, with no header rows on the second and third pages: Please NOTE that we’re in Print Layout view on the View menu at the moment: when we repeat the headers, the repeat is only visible in Print Layout or Print Preview, both of which show you what your document will look like when it’s printed. Word defaults to Print Layout view, but check, just in case: Select the header row of your table so that you can tell Word that this is the header row by left-clicking with your cursor to the left-hand side of that row: Now, because you’ve got a table in your document, Word will have added the Table menu tabs to your ribbon. There are two: Layout and Design. Choose the Layout tab.
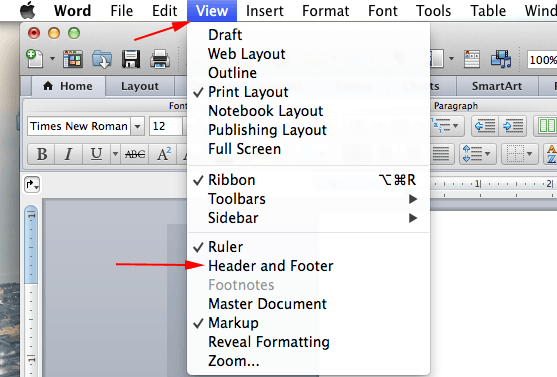
Open a multipage document in Word. On the first page, double-click at the top of the document in the area where the header will appear or at the bottom of the page where the footer will appear to open the Header & Footer tab on the ribbon.
Find the Repeat Header Rows button: Click on the Repeat Header Rows button. Like magic, if you scroll down the page, you will now see that your header row is repeated! Note: if you don’t have a row selected, the Repeat Header Row button will be greyed out and you can’t press it. Here’s the magical thing: you can of course do this manually by inserting a row at the top of each page of your table.
But then, if you move the text of the table around or resize it, you risk your manual header row not being the top row of your page. Free photo editor for mac not needing a flash player. Using the automatic function means that, whatever you do to your table, the top row of a new page will always be the header row (UNLESS you force a manual page break). Here, I’ve changed the text size to make it larger. You can see that the first entry on the second page is no longer Coleridge, but the header row is still in place: How do I repeat multiple header rows in Word? You can display multiple header rows in Word in the same way.
Make sure that you highlight BOTH rows that you want to repeat, and press the Repeat Header Rows button as before: And there you go: the first two lines of the table repeat on each page: How to repeat header rows in Word 2003 In Word 2003, you will need to use menus rather than the ribbon. Highlight the header row of your table. Select the Table menu and click Heading Rows Repeat. ———– Today we’ve learned how to make the header rows repeat in a Word document. This is part of a series on Tables which I’ll be writing and publishing over the next few weeks. Related posts: Please note, these hints work with versions of Microsoft Word currently in use – Word 2003, Word 2007 and Word 2010, all for PC. Mac compatible versions of Word should have similar options.